The plan
The sled push is one of those CrossFit movements that feels honest right away. There is no complicated catch, no fancy transition, and nowhere to hide when the turf gets long. You put your hands on the posts, lean in, and find out whether your legs and lungs can keep talking to each other.
That simplicity can fool athletes. A sled that moves well for the first ten yards can turn into a dead stop when the body angle gets too tall, the feet start chopping, or the load is picked for ego instead of the workout. Good sled pushing is less about rage and more about pressure: steady drive, quiet steps, and a position you can repeat.
- Lean your whole body into the sled instead of pushing from upright arms.
- Pick a load that matches the workout goal: speed, grind, or short heavy effort.
- Scale early if the sled stops every few steps or your low back takes over.
Why the sled push hits harder than it looks
A sled push does not have an eccentric phase the way a squat or lunge does. You are not lowering a weight and catching a stretch. You are producing force again and again against friction. That is why it can feel brutal without leaving the same soreness as high-volume jumping or barbell cycling.
It also punishes poor posture quickly. Athletes who understand bracing on a CrossFit deadlift usually pick up the lesson faster: the legs drive, but the trunk has to stay organized or the work leaks into the low back.
Set your body angle before you start sprinting
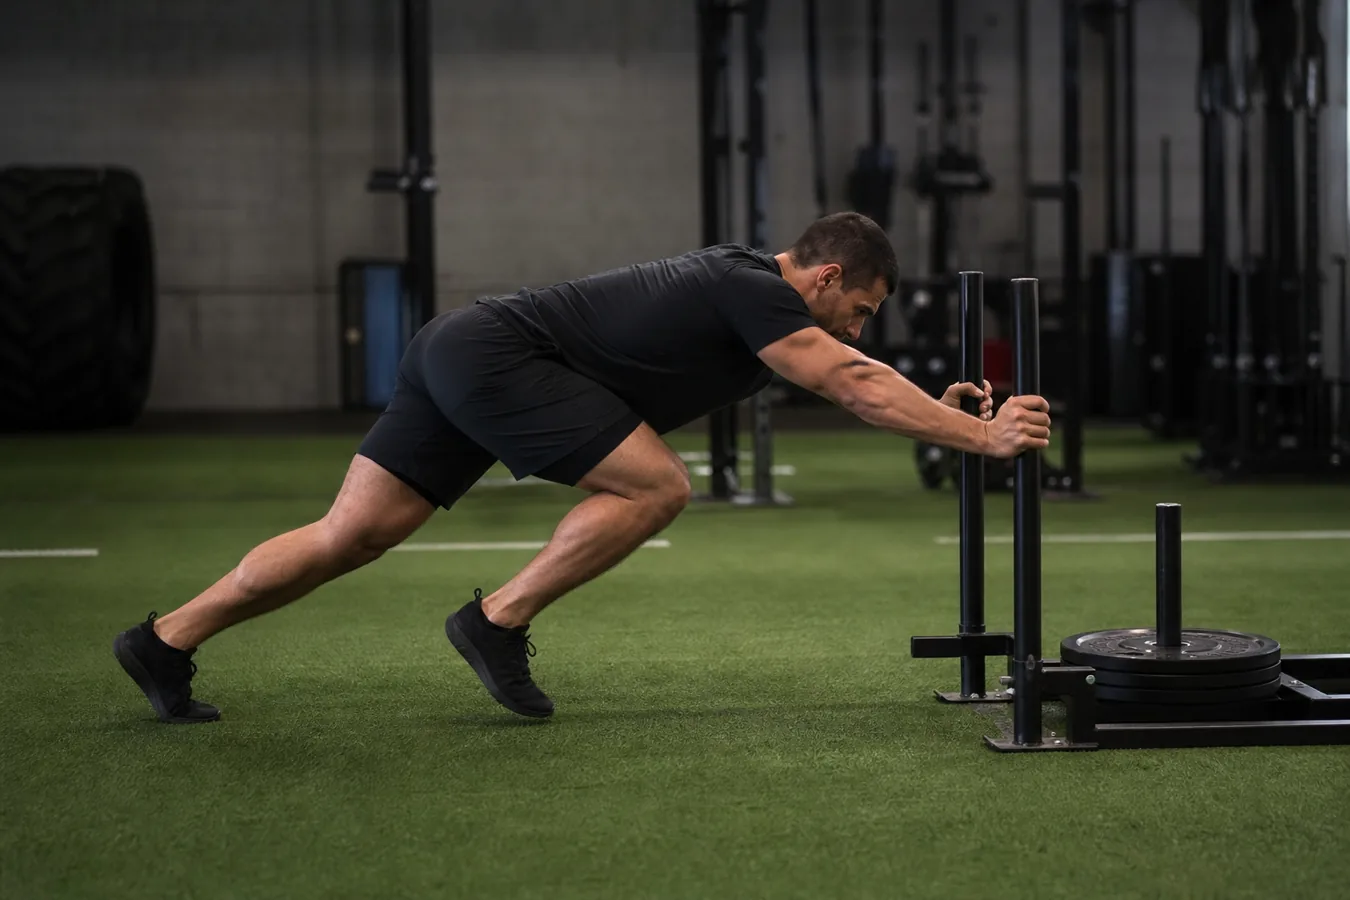
Start with the hands firm on the posts, arms long enough to keep space, and the chest angled toward the sled. The exact height depends on the sled and the athlete, but the mistake is easy to spot: standing too tall and trying to press the sled forward with the shoulders.
Think about driving the turf behind you. Short, fast steps work for a lighter sprint sled. Heavier pushes usually need slower, deliberate steps where each foot hits under the hips and keeps pressure moving forward. If the feet are spinning in place, the load is too heavy or the body angle is wrong.
| Checkpoint | What to look for | Quick fix |
|---|---|---|
| Body angle | Torso leans into the sled without folding at the waist | Step back, reset the hands, and drive through the legs |
| Footwork | Steps are short enough to keep pressure on the turf | Stop overstriding and keep the feet under the hips |
| Hands | Grip is firm but the shoulders are not shrugged to the ears | Relax the neck and push through straight arms |
| Load | Sled moves at the intended pace for the workout | Strip weight if every interval becomes a stall |
| Breathing | Athlete can keep moving without panic breathing after five yards | Use shorter segments or planned breaks |
Watch the sled before you copy the effort
This demo is useful because it shows the simple parts people rush past: hand placement, lean, step rhythm, and how the athlete keeps the sled moving without bouncing up and down. Watch the feet first. If the feet are calm, the push usually has a chance.
How to load the sled for the workout you actually want
There is a big difference between a fast sled sprint and a heavy grind. If the workout asks for repeated short trips with little rest, the sled should move immediately when the athlete commits to it. If the goal is strength or a heavy partner effort, slower movement is fine, but the athlete should still be able to create continuous pressure.
The same pacing issue shows up on odd-object work like the farmer carry in CrossFit. Going too heavy can look tough for one round and then ruin the intended stimulus for the rest of the session.

Common mistakes that stop the sled cold
Most sled push mistakes are not dramatic. They show up as tiny leaks that add up: soft midline, loose hands, feet slipping, or an athlete trying to win the first length instead of finishing the workout.
- Loading the sled so heavy that it only moves in broken inches.
- Standing upright and turning the push into an awkward shoulder press.
- Taking long reaching steps that kill traction.
- Letting the hips swing side to side instead of driving straight through the sled.
- Starting every interval too fast, then needing a long reset halfway down the turf.
When to scale a sled push
Scale the sled when the movement no longer matches the workout. A class may need lighter loads, shorter turf lengths, partner turns, or a slower cap per round. For newer athletes, the best version is often a moderate sled that moves cleanly for the full distance.
If the workout is already full of squatting, jumping, or heavy carries, be honest about leg fatigue before the first push. The goal is not to survive a bad load choice. It is to train a strong drive that still looks like the same movement at the end. That is the same logic behind a smart CrossFit scaling plan: keep the stimulus, remove the part that makes the workout fall apart.